
◷ Reading Time: 9 minutes
Whenever we want to add new functionality to FlexRule Designer, we create a class library using .NET Standard (the latest version). The namespace of every extension is FlexRule.Extensions.{NameOfExtension}.
Getting Started
Project and Solution Structure
Make sure to have a workspace folder in your preferred directory to easily manage your code repository, for example:

Also, we are using GIT and it is up to you which tool you want to use, but we suggest using GitExtension for that.
As for the development, you may download your preferred IDE whether it is the latest Visual Studio Community or Visual Studio Code.
When creating your project, add a src folder that contains the SDK project and the unit test project.
As we are using the .NET or .NET standard for our SDKs, you may opt to use either nUnit or xUnit for testing.
Simple Calculator Extension
For this tutorial, we will create a simple Calculator Extension that does Addition and Division. (Visual Studio Community)
1. Create a .NET standard class library project
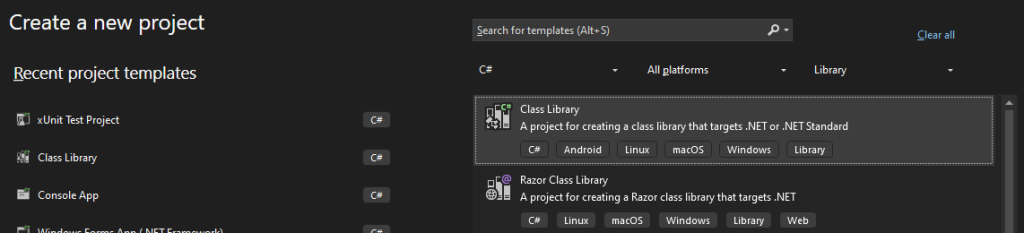
2. Name the project and solution to FlexRule.Extensions.Calculator

3. Go to your project directory, create src folder then move the solution file and the project folder to src.
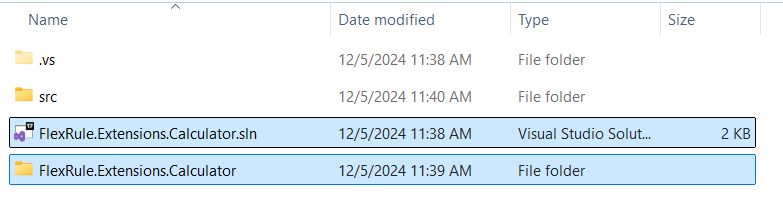
4. Create the required folders as shown below.

5. Create CalculatorService class under Core folder
namespace FlexRule.Extensions.Calculator.Core
{
    public class CalculatorService
    {
        public double Add(double firstNumber, double secondNumber)
        {
            return firstNumber + secondNumber;
        }
        public double Divide(double firstNumber, double secondNumber)
        {
            if (secondNumber == 0) throw new DivideByZeroException("second number can not be zero");
            return firstNumber / secondNumber;
        }
    }
}
6. Create your unit test, for this example, I used xUnit, and name it to FlexRule.Extensions.Calculator.Tests.

7. Then add the Project Reference for it by right click on the Dependencies.

8. Add CalculatorServiceTest class and implement your unit tests. Once done run and check if there are issues.
using FlexRule.Extensions.Calculator.Core;
namespace FlexRule.Extensions.Calculator.Tests
{
    /// <summary>
    /// You need to create test for the core functionality that does a specific job
    /// <remarks>
    /// In this example we are building a calculator, so we need to make sure Calculator functionality works based on
    /// our specification.
    /// </remarks>
    /// </summary>
    public class CalculatorServiceTest
    {
        [Fact]
        public void Will_Compute_Sum()
        {
            int num1 = 5;
            int num2 = 2;
            var calculator = new CalculatorService();
            var sum = calculator.Add(num1, num2);
            Assert.Equal(7, sum);
        }
        [Fact]
        public void Will_Compute_Divide()
        {
            int num1 = 10;
            int num2 = 2;
            var calculator = new CalculatorService();
            var divide = calculator.Divide(num1, num2);
            Assert.Equal(5, divide);
        }
        [Fact]
        public void Will_Error_Compute_Divide()
        {
            int num1 = 10;
            int num2 = 0;
            var calculator = new CalculatorService();
            Action act = () => calculator.Divide(num1, num2);
            Assert.Throws<DivideByZeroException>(act);
        }
    }
}
9. We will now create files for FRE integration.
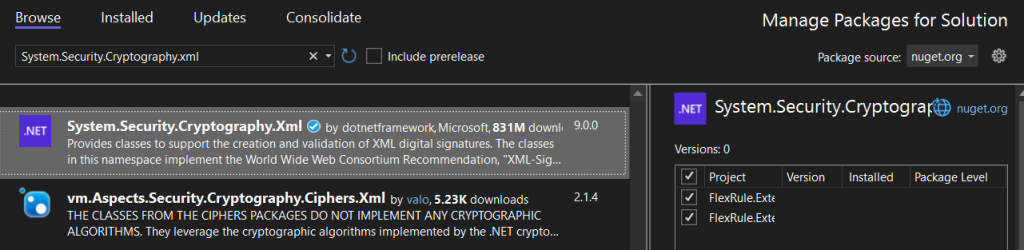
Download the System.Security.Cryptography.Xml NuGet package.
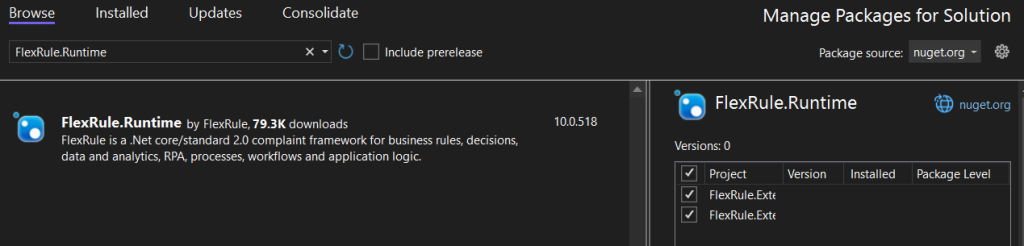
Then download the FlexRule.Runtime NuGet package.
10. Under Flows.Nodes > ActiveElements, create CalculatorActiveElement class.
using FlexRule.Core.Model;
namespace FlexRule.Extensions.Calculator.Flows.Nodes.ActiveElements
{
    /// <summary>
    /// We define a base class that handles multiple commands for the functionality we are building
    /// <remark>
    /// For instance, we have a calculator that supports multiple commands (functions) such as Add and Divide.
    /// This means both Add and Divide must implement this specific base type
    /// </remark>
    /// </summary>
    abstract class CalculatorActiveElement : ActiveElement, IElementExecutableItem
    {
        protected CalculatorActiveElement(ActiveElement parent, IElementModel elementSource)
            : base(parent, elementSource)
        {
        }
        public abstract object Execute(IActiveElementExecutor executor);
        public void Finalize(IActiveElementExecutor executor)
        {

        }
    }
}11. Create the active elements for Add, Divide, and the utility ValueTypeAttribute. These will be classes created under Flows.Nodes > ActiveElements as AdditionActiveElement and DivisionActiveElement
using FlexRule.Core.Model;
using FlexRule.Extensions.Calculator.Core;
using FlexRule.Extensions.Calculator.Flow.Nodes.ActiveElements;
namespace FlexRule.Extensions.Calculator.Flows.Nodes.ActiveElements
{
    class AdditionActiveElement : CalculatorActiveElement
    {
        // Name of this active element
        public const string ElementName = "CalculatorAdd";
        // Parameters
        public const string ParamReturn = "return";
        public const string ParamFirstNumber = "firstNumber";
        public const string ParamSecondNumber = "secondNumber";
        // Parameter Types
        public const string ParamFirstNumberType = "firstNumberType";
        public const string ParamSecondNumberType = "secondNumberType";
        // Value Types
        private readonly ValueTypeAttribute _firstNumberType;
        private readonly ValueTypeAttribute _secondNumberType;
        // Private values to resolve parameter names
        private string Return { get; set; }
        private string FirstNumber { get; set; }
        private string SecondNumber { get; set; }
        public AdditionActiveElement(ActiveElement parent, IElementModel elementSource)
            : base(parent, elementSource)
        {
            // resolve parameter names
            Return = elementSource.Parameters[ParamReturn];
            FirstNumber = elementSource.Parameters[ParamFirstNumber];
            SecondNumber = elementSource.Parameters[ParamSecondNumber];
            // Resolve if what value type (for example : String, Expression or FormattedString)
            _firstNumberType = new ValueTypeAttribute(elementSource, ParamFirstNumberType);
            _secondNumberType = new ValueTypeAttribute(elementSource, ParamSecondNumberType);
            // Validation for required parameters
            AssertHelper.MissingParam(string.IsNullOrWhiteSpace(Return), this, "Parameter the Sum result will be stored to is required");
            AssertHelper.MissingParam(string.IsNullOrWhiteSpace(FirstNumber), this, "FirstNumber parameter name is required");
            AssertHelper.MissingParam(string.IsNullOrWhiteSpace(SecondNumber), this, "SecondNumber parameter name is required");
        }
        public override object Execute(IActiveElementExecutor executor)
        {
            // reference to Variable Container that holders all data in the execution context
            // Including, inputs values from user, output that we need to set and so on.
            var vc = executor.ContextProvider.Context.VariableContainer;
            // We read the values from user inputs
            var firstNumber = _firstNumberType.EvaluateValue(vc, FirstNumber);
            var secondNumber = _secondNumberType.EvaluateValue(vc, SecondNumber);
            // use the library we created to do the calculation
            var calculatorService = new CalculatorService();
            var result = calculatorService.Add(firstNumber, secondNumber);
            // we assign the value to the context of execution
            vc[Return] = result;
            // we return the result to Runtime (FRE)
            return result;
        }
    }
}
11. Create a ValueTypeAttribute class, this is for evaluating the value types for example if it is a string it will just use the literal value and if it is an expression then it can retrieve a value from a variable.
using FlexRule.Core.Model;
namespace FlexRule.Extensions.Calculator.Flow.Nodes.ActiveElements
{
    internal class ValueTypeAttribute : ValueTypeBehaviour
    {
        public IElementModel Model { get; }
        public ValueTypeAttribute(IElementModel model, string valueType)
            : base(model.Parameters[valueType] ?? "string")
        {
            Model = model;
        }
    }
    public class ValueTypeBehaviour
    {
        private string ValueType { get; }
        public bool IsExpression => string.Compare(ValueType, "expression", StringComparison.OrdinalIgnoreCase) == 0;
        public bool IsNumeric => string.Compare(ValueType, "numeric", StringComparison.OrdinalIgnoreCase) == 0;
        public ValueTypeBehaviour(string valueType)
        {
            ValueType = valueType ?? throw new ArgumentNullException(nameof(valueType));
        }
        public double EvaluateValue(IVariableContainer vc, string value)
        {
            if (IsNumeric)
                return ConvertHelper.ChangeType<double>(vc[value]);
            if (IsExpression)
            {
                var res = vc.Compute((string)vc[value]);
                if (res == null)
                    throw new Exception("Value expression cannot be evaluated to null for parameter: " + value);
                return ConvertHelper.ChangeType<double>(res);
            }
            throw new Exception("Invalid input format");
        }
    }
}
12. Under Flows.Nodes create the Factory class named CalculateFactory. This class will inherit from AbstractElementActivatorFactory which is responsible for finding the element from the registry and activating it to be an Active Element.
using FlexRule.Core.Model;
namespace FlexRule.Extensions.Calculator.Flows.Nodes
{
    public class CalculateFactory : AbstractElementActivatorFactory
    {
        public override ActiveElement Create(ActiveElement parent, IElementModel source, object[] arguments)
        {
            switch (source.Name)
            {
                case ActiveElements.AdditionActiveElement.ElementName:
                    return new ActiveElements.AdditionActiveElement(parent, source);
                // Add DivisionActiveElement here
                default:
                    return null;
            }
        }
    }
}
13. Create the NodeAdapter class (CalculateNodeAdapter) which inherits from ElementExecutableItemAdapter. This is responsible for executing the Factory.
using FlexRule.Core.Model;
using FlexRule.Flows;
using FlexRule.Flows.ActivityNodeExecutors;
using FlexRule.Flows.Model.Nodes;
namespace FlexRule.Extensions.Calculator.Flows.Nodes
{
    class CalculateNodeAdapter : ElementExecutableItemAdapter
    {
        private readonly CalculateFactory _calculateFactory
            ;
        public CalculateNodeAdapter()
            : base(null)
        {
            _calculateFactory = new CalculateFactory();
        }
        protected override string GetElementName(IActiveElementExecutor executor, Transition path, INodeExecutableItem node)
        {
            var n = node.Node.Model.Childs.FirstOrDefault(x => x.Name != "Transition" && x.Name != "Handler");
            if (n == null)
                throw new ActiveElementException("Could not find activity command");
            return n.Name;
        }
        protected override IElementExecutableItem Create(Node parent, IElementModel source)
        {
            return _calculateFactory.Create(parent, source) as IElementExecutableItem;
        }
    }
}
14. On your unit test project, create a class named CalculatorFlowTest.
using System.Text;
namespace FlexRule.Extensions.Calculator.Tests
{
    public class CalculatorFlowTest
    {
        [Fact]
        public void Will_Execute_Addition_Flow()
        {
            var flow = @"<Flow name=""ActivityFlow"">
  <Declaration>
    <Define name=""n1"" direction=""In"" />
    <Define name=""n2"" direction=""In"" type=""int"" />
    <Define name=""sum"" direction=""out"" />
  </Declaration>
  <Nodes>
    <Start name=""Start2"">
      <Transition name=""Transition5"" to=""ActivityAddition"" />
    </Start>
    <End name=""End3"" />
    <Activity name=""ActivityAddition"">
      <Handler assembly=""FlexRule.Extensions.Calculator.dll"" type=""FlexRule.Extensions.Calculator.Flows.Nodes.CalculateNodeAdapter"" />
      <CalculatorAdd firstNumber=""n1"" firstNumberType=""Expression"" secondNumber=""n2"" secondNumberType=""Numeric"" return=""sum"" />
      <Transition name=""Transition6"" to=""End3"" />
    </Activity>
  </Nodes>
</Flow>";
            var engine = RuntimeEngine.FromXml(Encoding.UTF8.GetBytes(flow));
            // this is used as an as input expression for calculator - so calculator must do this calculation first
            string num1 = "10/2";
            // this is used as a numeric input to calculator, so it will be used directly.
            int num2 = 13;
            // we pass the inputs to engine for execution
            var result = engine.Run(num1, num2);
            var sum = result.Context.VariableContainer["sum"];
            Assert.Equal(18d, sum);
        }
    }
}
15. Create CustomLicenseProvider class (also in the unit test project). This is needed so that will Flexrule.Runtime will execute your commands.
using FlexRule.Extensions.Calculator.Tests;
using FlexRule.License;
[assembly: LicenseProvider(typeof(CustomLicenseProvider))]
namespace FlexRule.Extensions.Calculator.Tests
{
    public class CustomLicenseProvider : ILicenseProvider
    {
        public string ReadLicense()
         {
             // return your license context, shown below as a string, copy and paste from your license file.
             return "";
         }
     }
 }
16. Debug and check how things work.
Next step: Designer Integration